
Denim Jacket Revival 🌙🩷
I had a plain denim jacket sitting in my closet that I hadn’t worn since ~2017 (nine years!). There was nothing wrong with it—in fact, I liked the way it fit, and finding a good jacket is tough with these beefy linebacker-adjacent shoulders of mine. But I just felt like every time I put it on, it steered my outfit vibes firmly into art teacher territory. And not in a good way (and yes, I do believe there is a good way).
So one rainy day, I discovered the original Sailor Moon series on Tubi and started binging. After a few episodes spent envying their ‘90s anime fashion and feeling buoyed by all the defended love and justice I witnessed, I decided to find a Sailor Moon-related craft project. Around this time, I had also seen a Reddit post about successfully using acrylic paint on fabric.
Cue: the denim jacket revival project.
Materials Needed:
Project Prep Materials:
Printer
Scissors
Clear Packing Tape
Reference Image / Artwork
Image Editing Software (Basic): I used Mac’s built-in Preview app, but Canva, Adobe, or other products work too.
Cardboard: Backing to help you draw/paint smoothly and to prevent the paint from soaking through the fabric.
Binder Clips (or similar): To attach fabric to cardboard backing
Project Materials:
Article of clothing: I used a denim jacket, but you could easily use this technique for a hat, t-shirt, sweatshirt, or anything else. Highly recommend thrifting something unique for this purpose.
Acrylic Paints & Paintbrushes: Go as fancy or cheap as you like.
Acrylic Liquid Fabric Medium: You’ll need a medium to mix with your paint so it’s flexible enough to stay on fabric. I used Liquitex.
Ballpoint pen: Or chalk or a washable tailor marker. Whatever you prefer when drawing.
Phase 1: Prep It
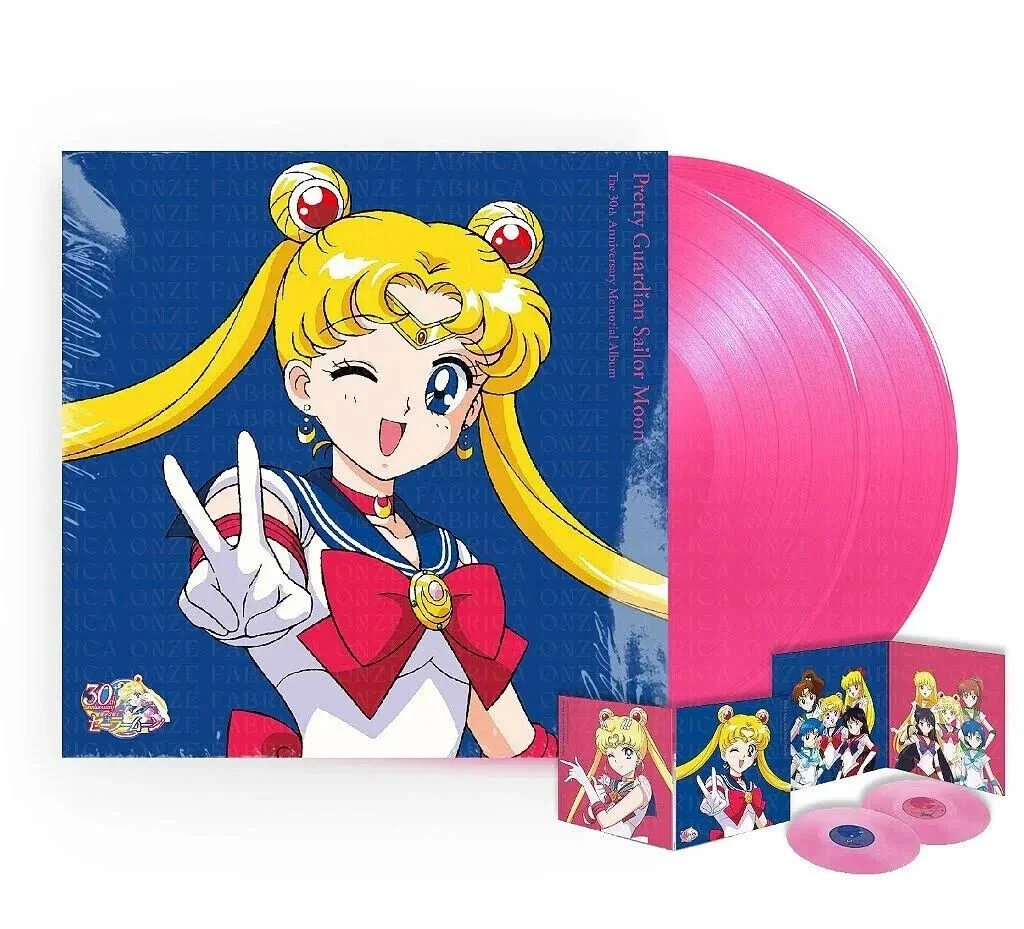
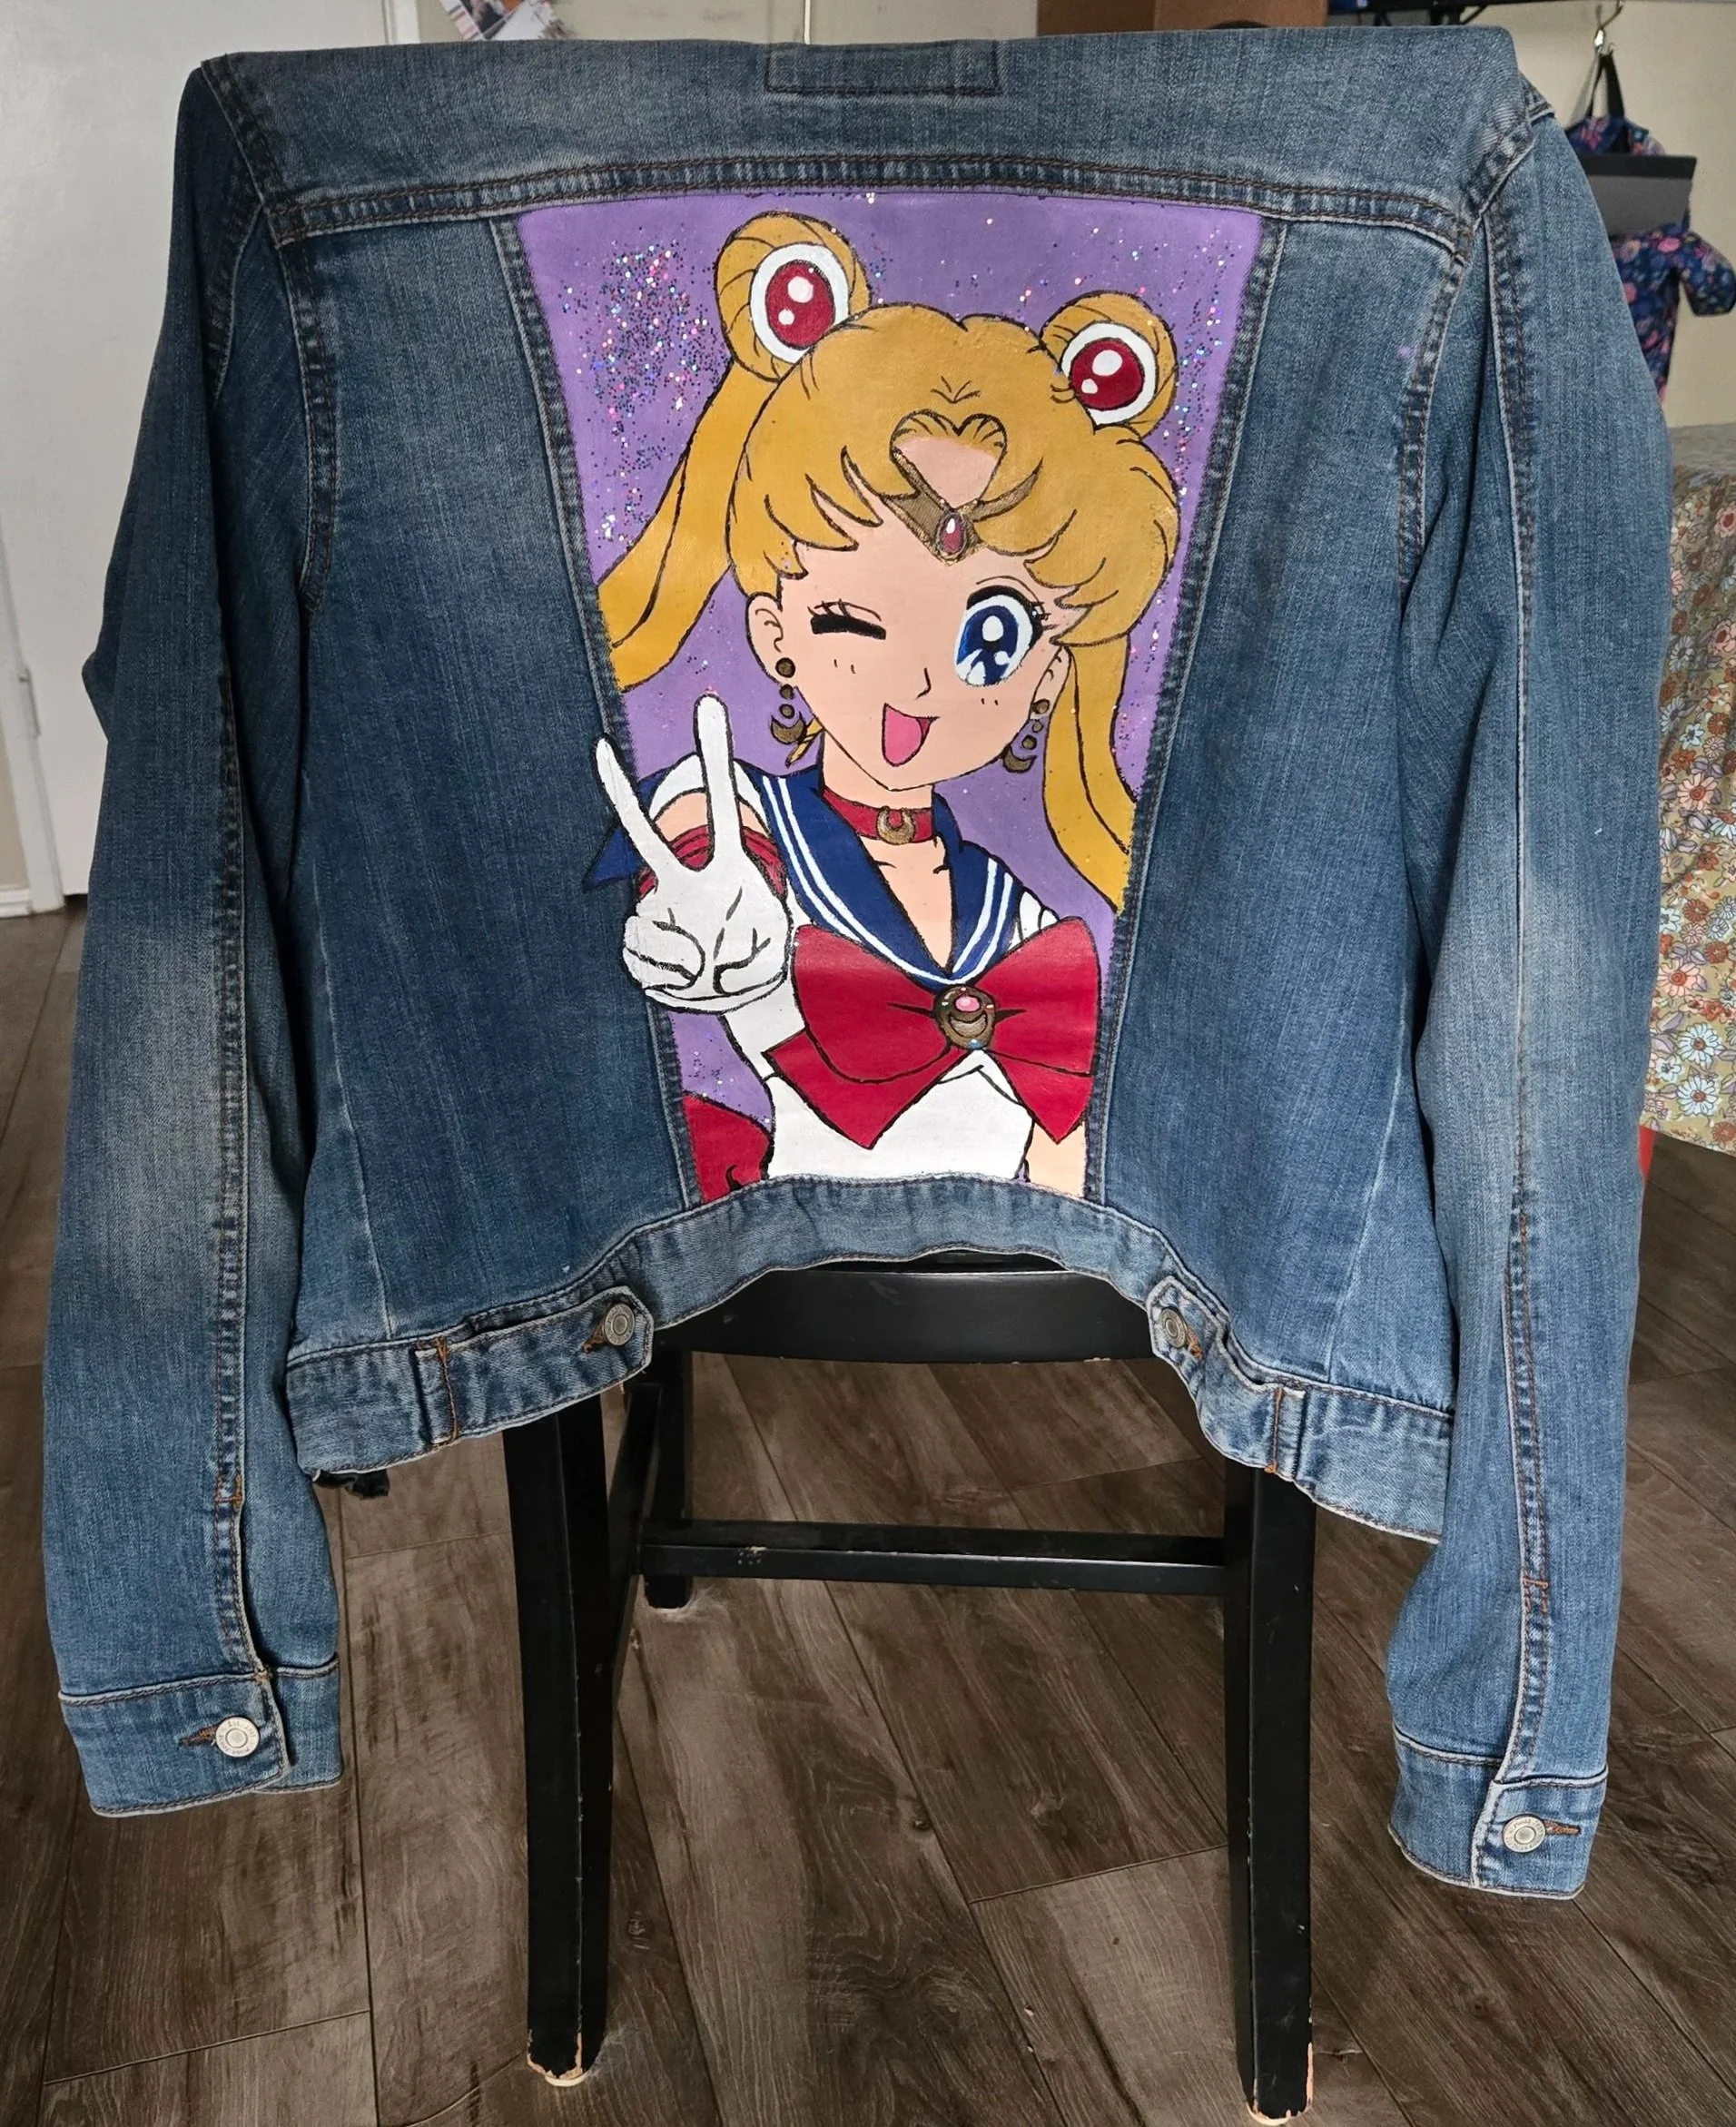
I started by searching for existing artwork. I wanted something cute, but not cheesy (not sure if that’s possible for a project like this, but hey, that was the goal). I also didn’t want anything overly detailed since I’d never painted on fabric before. Some quick searching led me to this Sailor Moon vinyl cover art. Perfection!
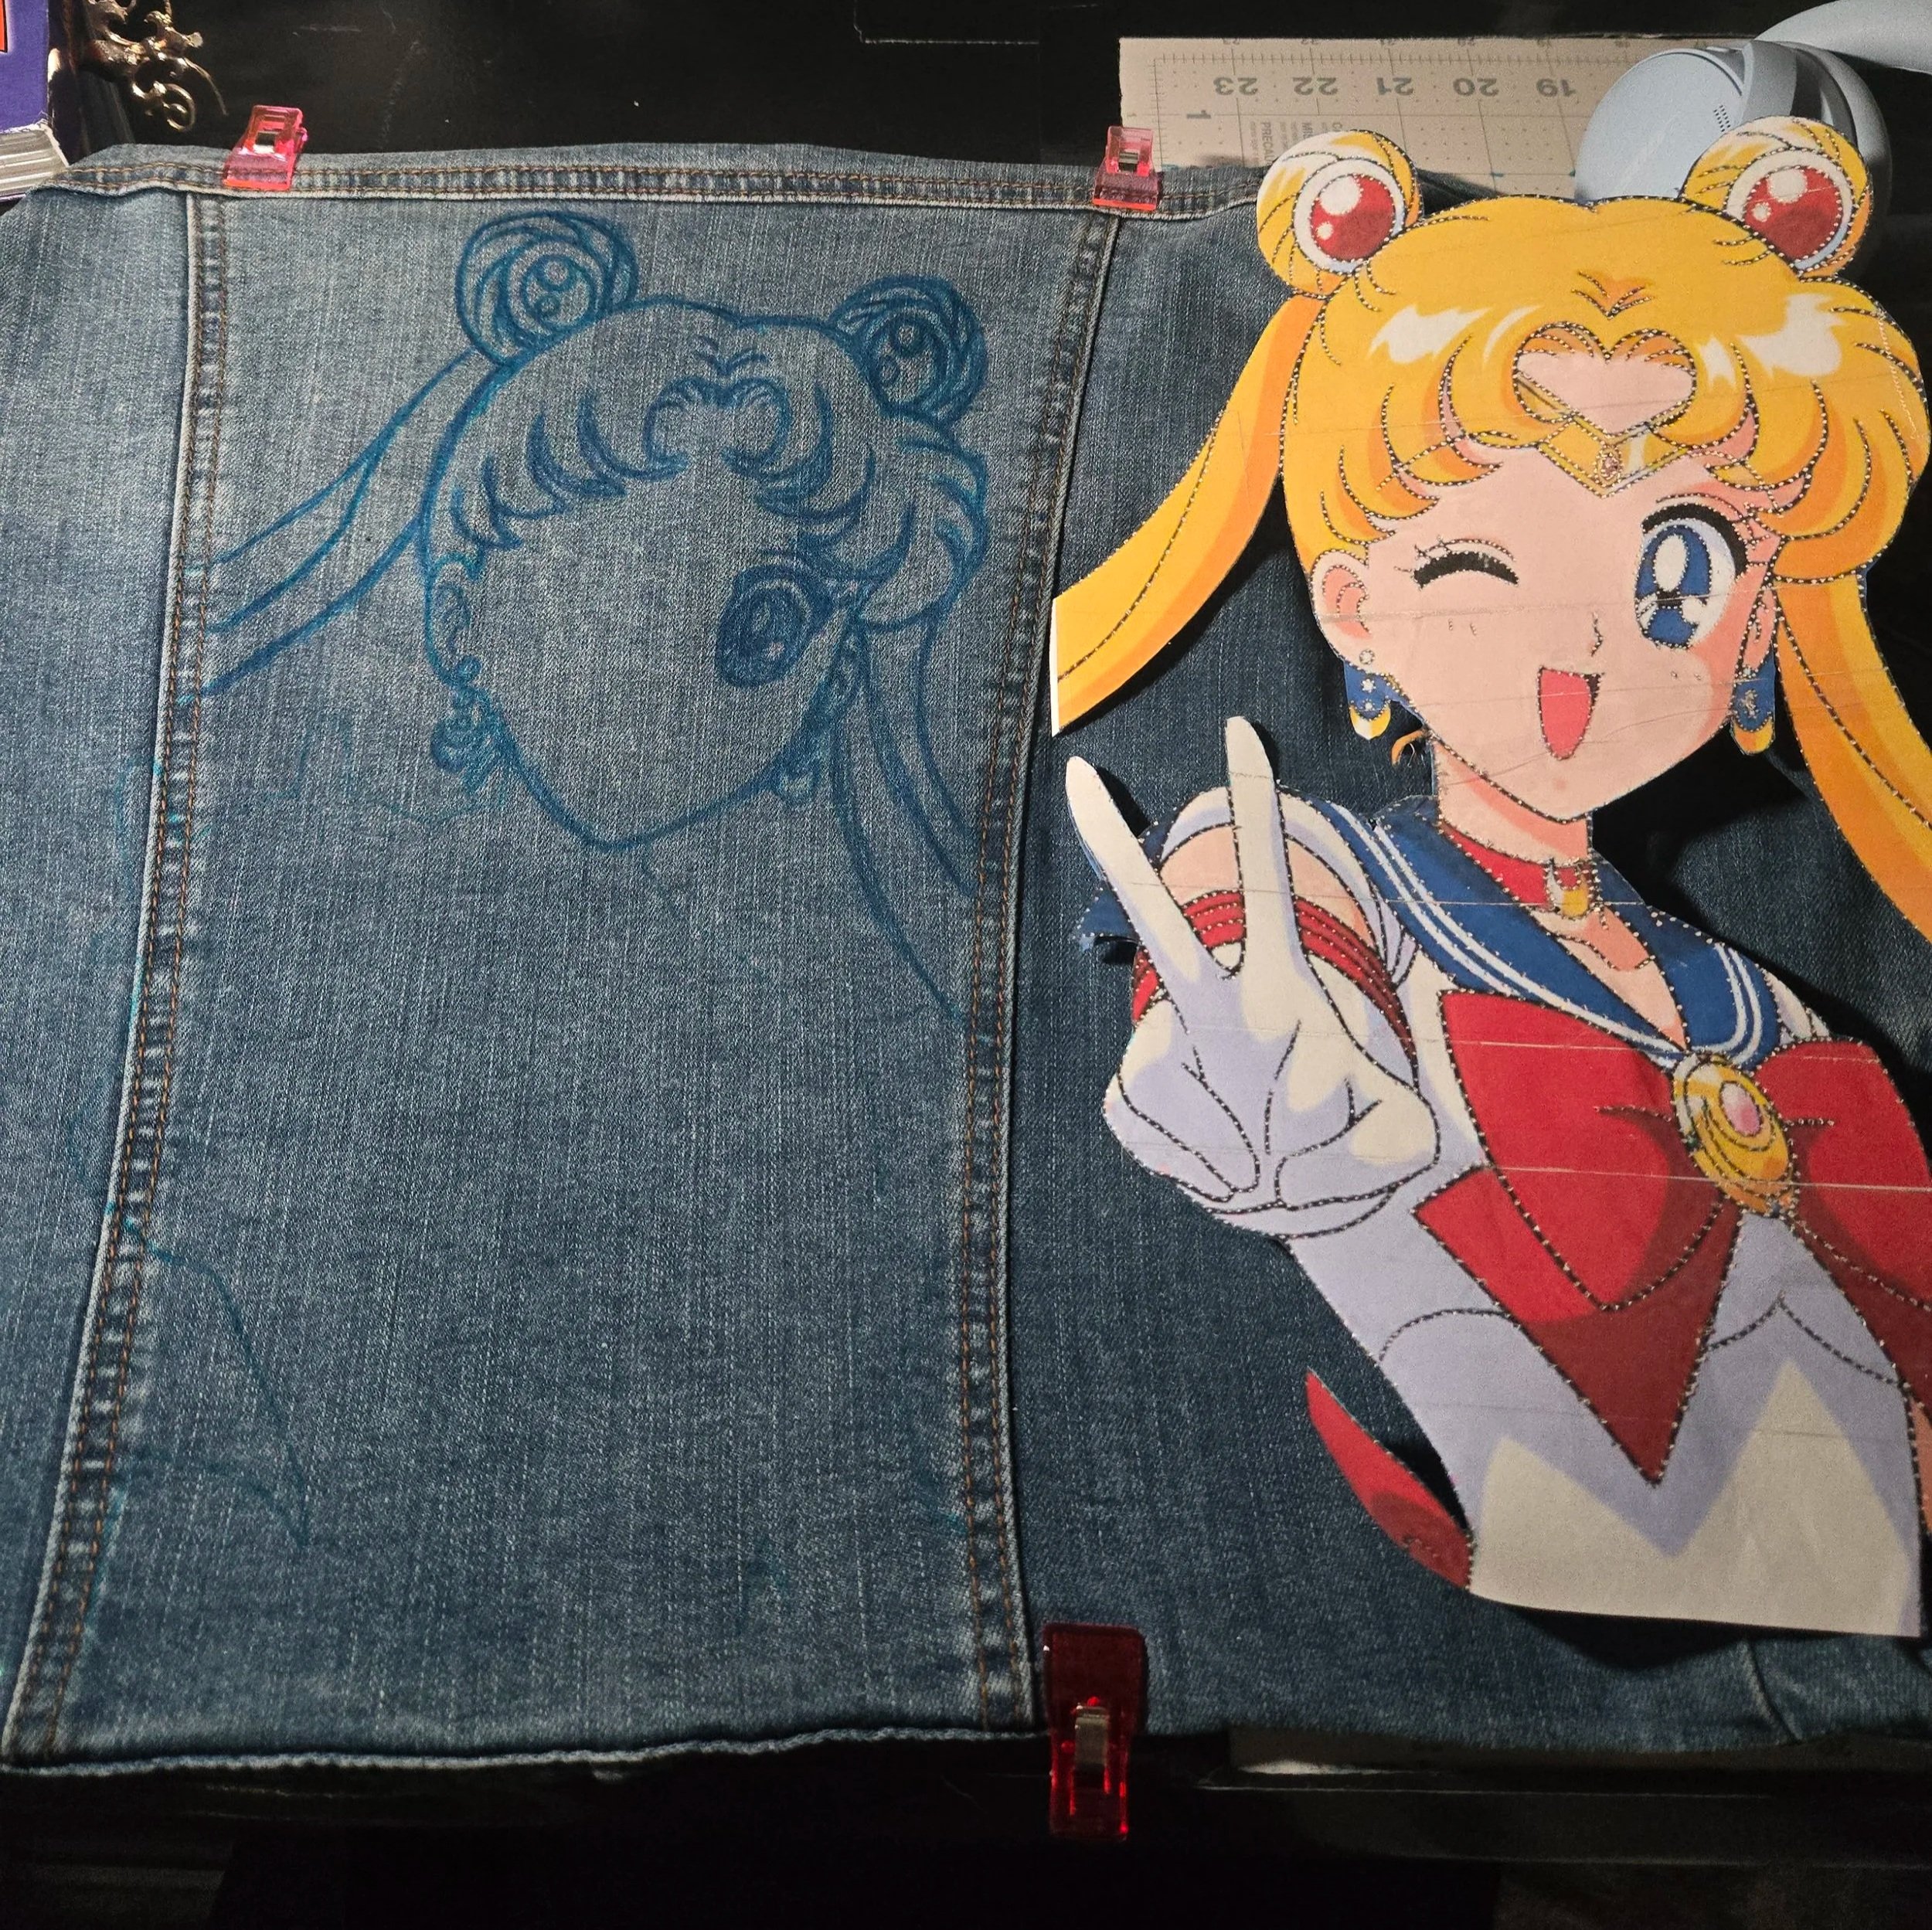
Once I found the artwork, I prepped the file. I used Preview (Mac) to crop it, remove the background, and resize it. I measured the size of the back panel of the jacket where I wanted the artwork to live, digitally scaled the artwork, and printed. Then I used clear packing tape to strengthen the stencil before I cut it out.
I also went ahead and ordered the medium to be mixed with my acrylics so the paint would be flexible enough for fabric use.
Phase 2: Draw It
After cutting out my stencil, I used sewing clips to attach the fabric to a piece of cardboard, then I played around with stencil placement before tracing the outline onto the jacket. Originally, I tried to use an old washable tailor marker, but it dried up on me quickly. Then I tried chalk, but found it was too imprecise (and messy). So I went with a light blue ballpoint pen, since I figured it was close to the color of the denim and would be painted over anyways.
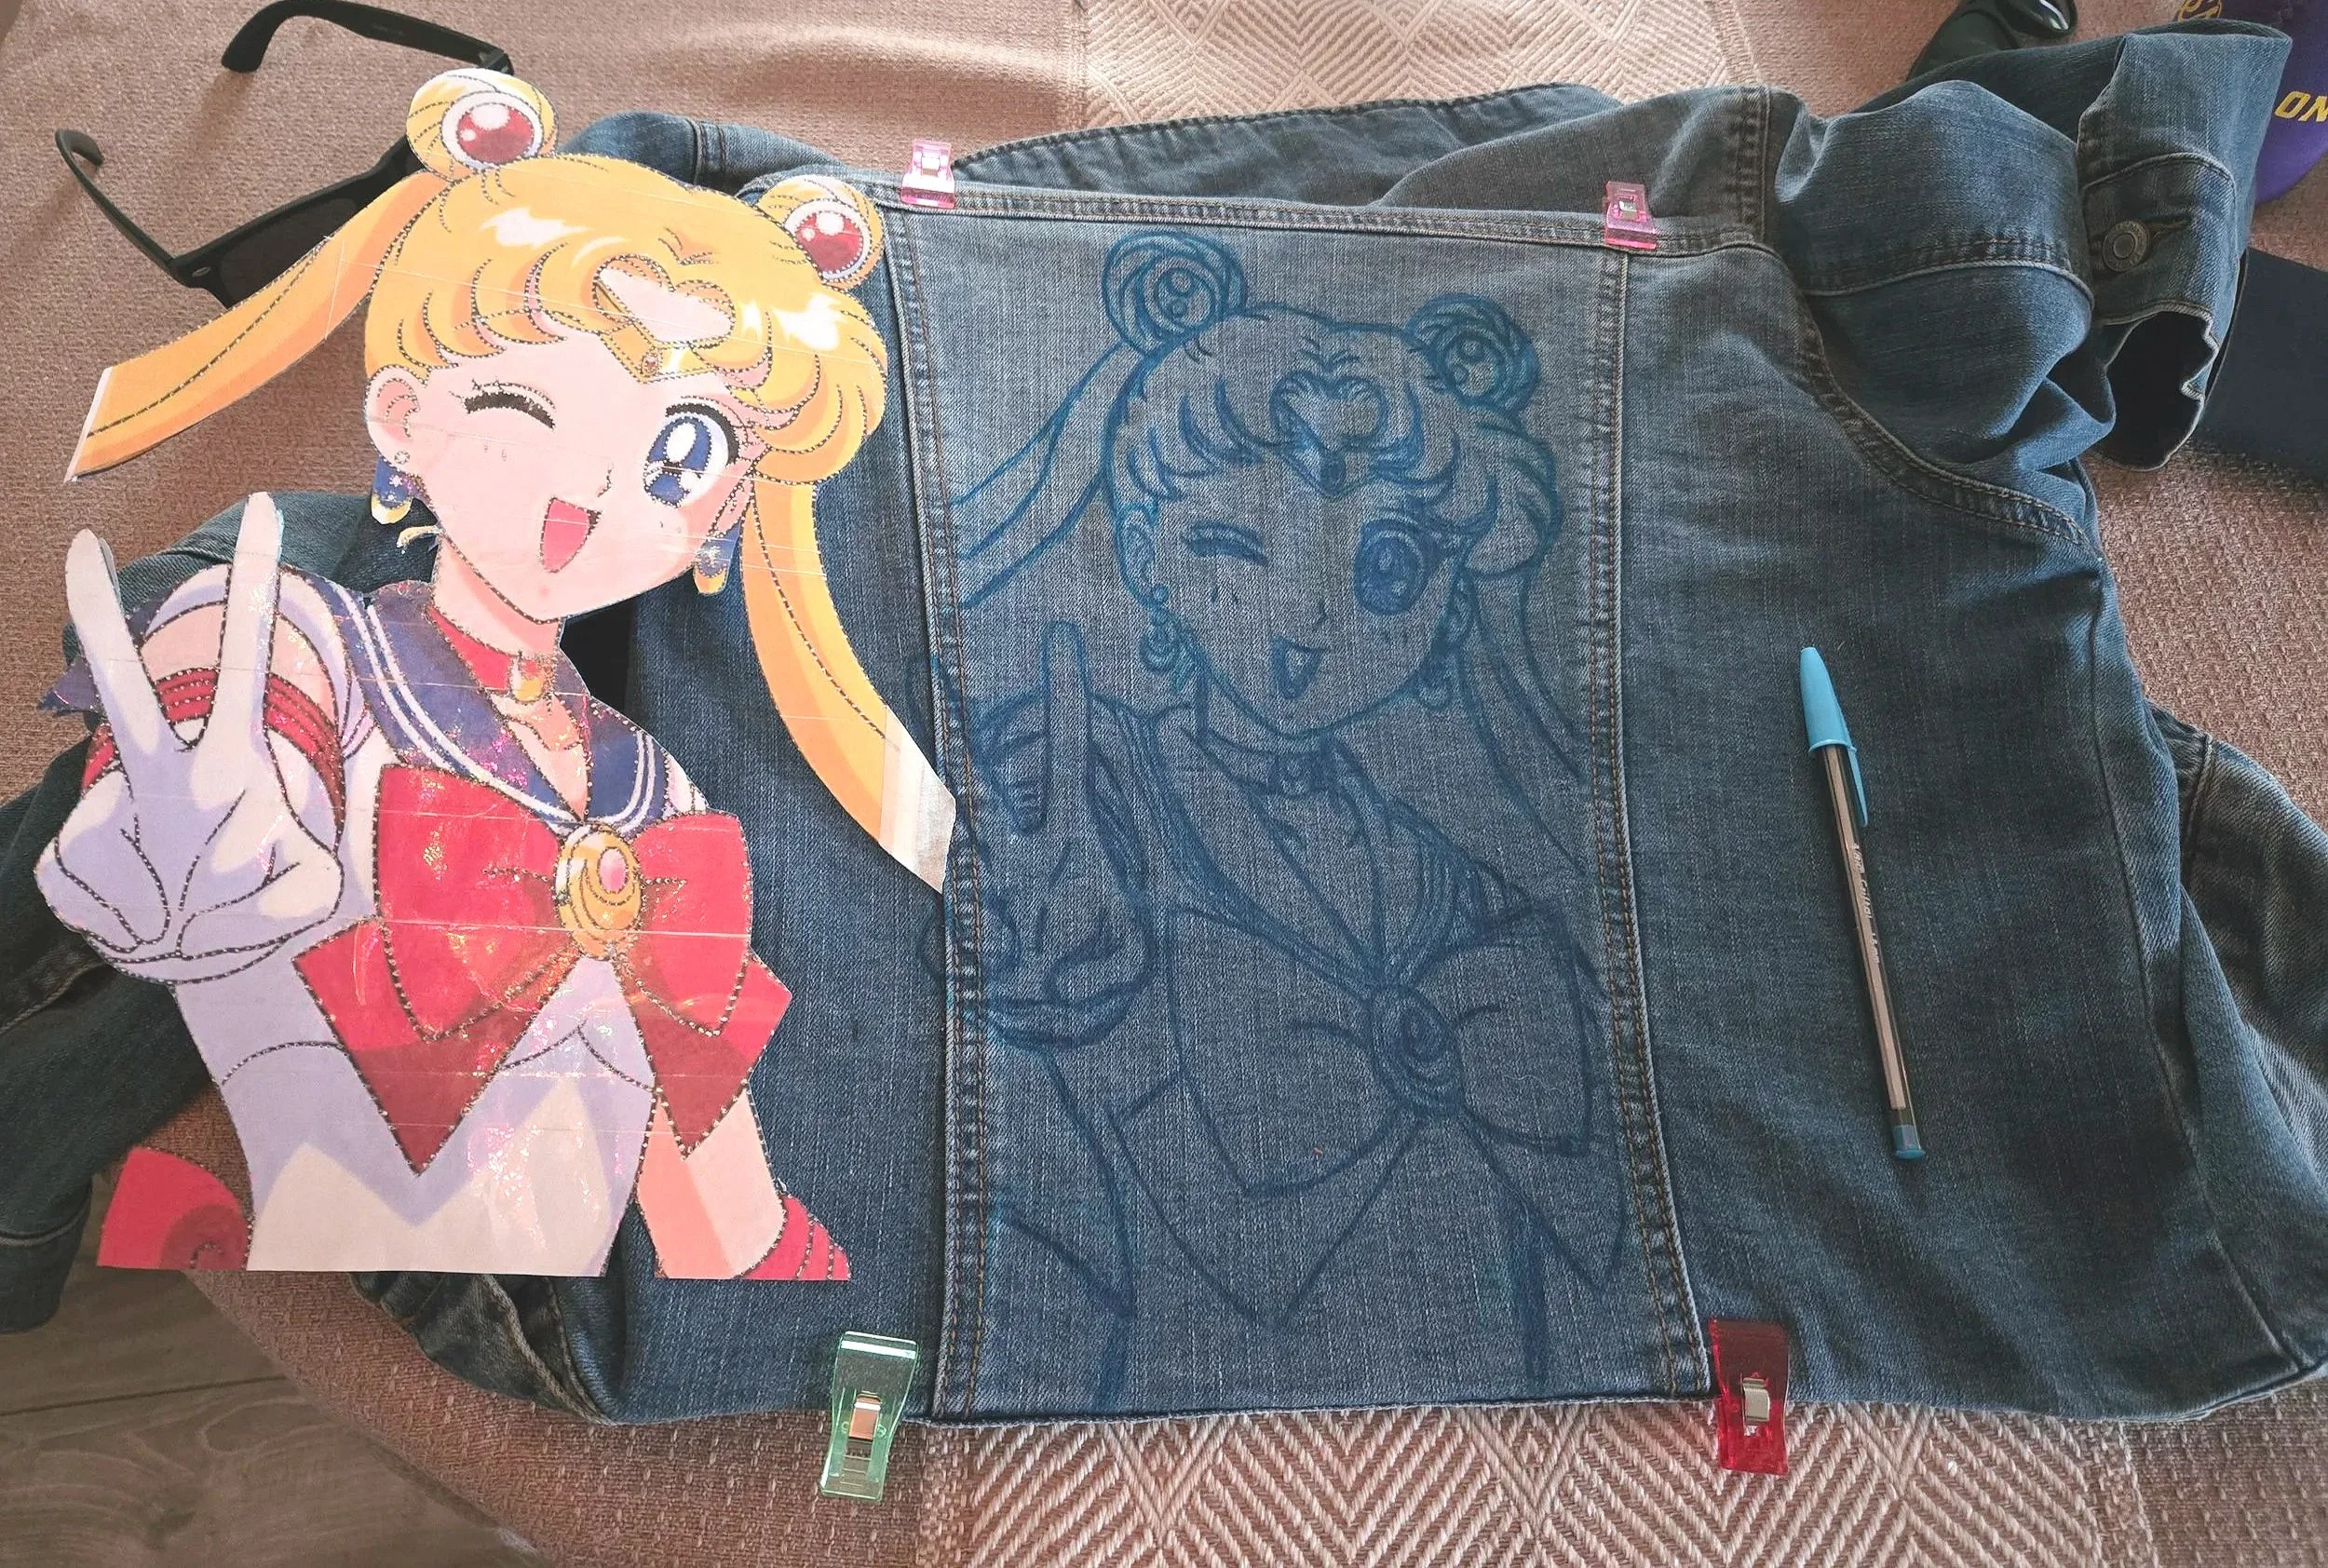
I traced the outline, then went back to draw in the details. I started from the center of her face and worked my way outwards to prevent spacing issues. Specifically, I wanted to make sure I didn’t squish her face awkwardly by working towards the center, which I knew I would, thanks to many years of my childhood spent doodling terrible Sailor Moons from memory in my school notebooks.
I drew in small sections: laying the template over the jacket then adding a few details at a time before overlaying again to check my work. It was easier than expected, and actually pretty enjoyable. Highly recommend finding a good audiobook for this & the painting step.
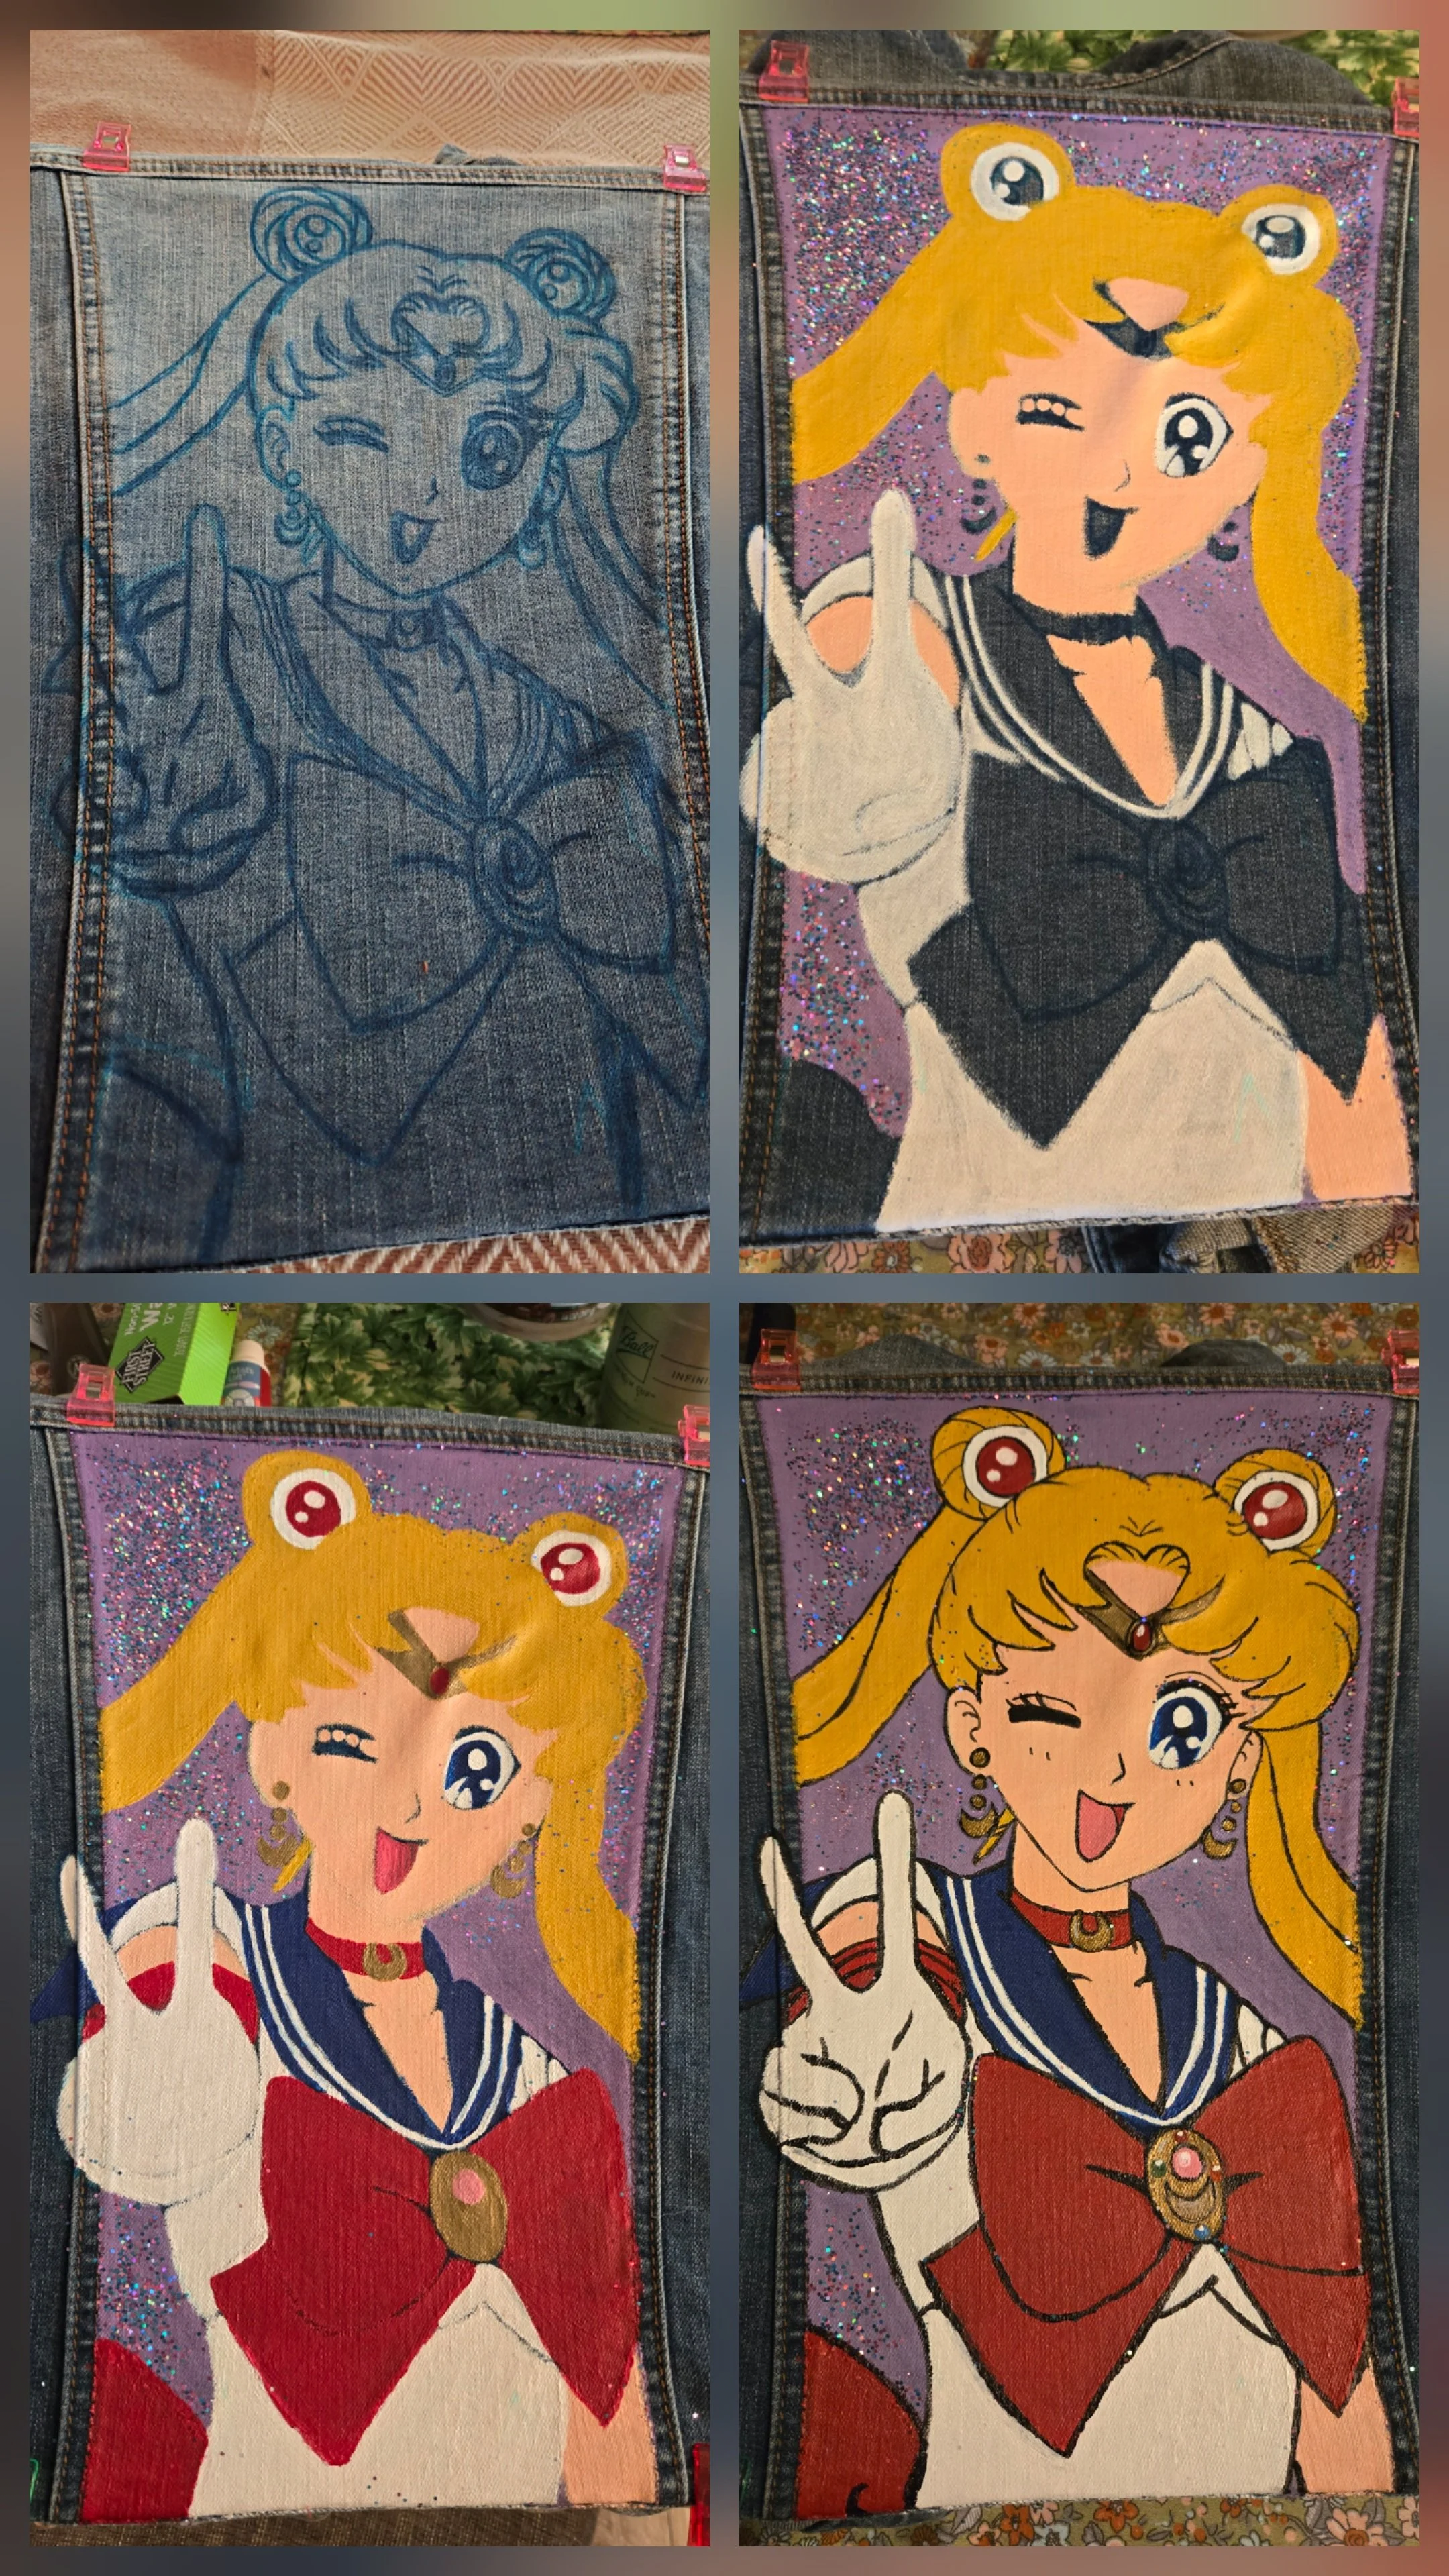
Phase 3: Paint it
Once the outline was complete, I mixed the fabric painting medium into my paint and, well, just started painting. I generally worked from the background of the artwork forward and with lighter colors before dark. The first 1-2 layers of paint for any given section were transparent and muddy-looking, but by layer 3, the colors were looking vibrant and opaque. You’ll need to layer paint pretty aggressively, but I was also surprised how quickly it dried—usually before I was even done repainting the section.
Some unknown, temporary madness overtook me midway through the project and I added glitter to the purple background while it was still damp. I like it and it looks cute, but goddamn—that glitter has spread throughout my apartment & will certainly be there long after I move out, so use at your own risk. ☠️
When it came time to outline, I thought I’d be clever and do them with a sharpie or paint marker for better control, buuuut the sharpie dried up immediately and I could only find fat paint markers, so ultimately had to suck it up and just use my thinnest paint brush.
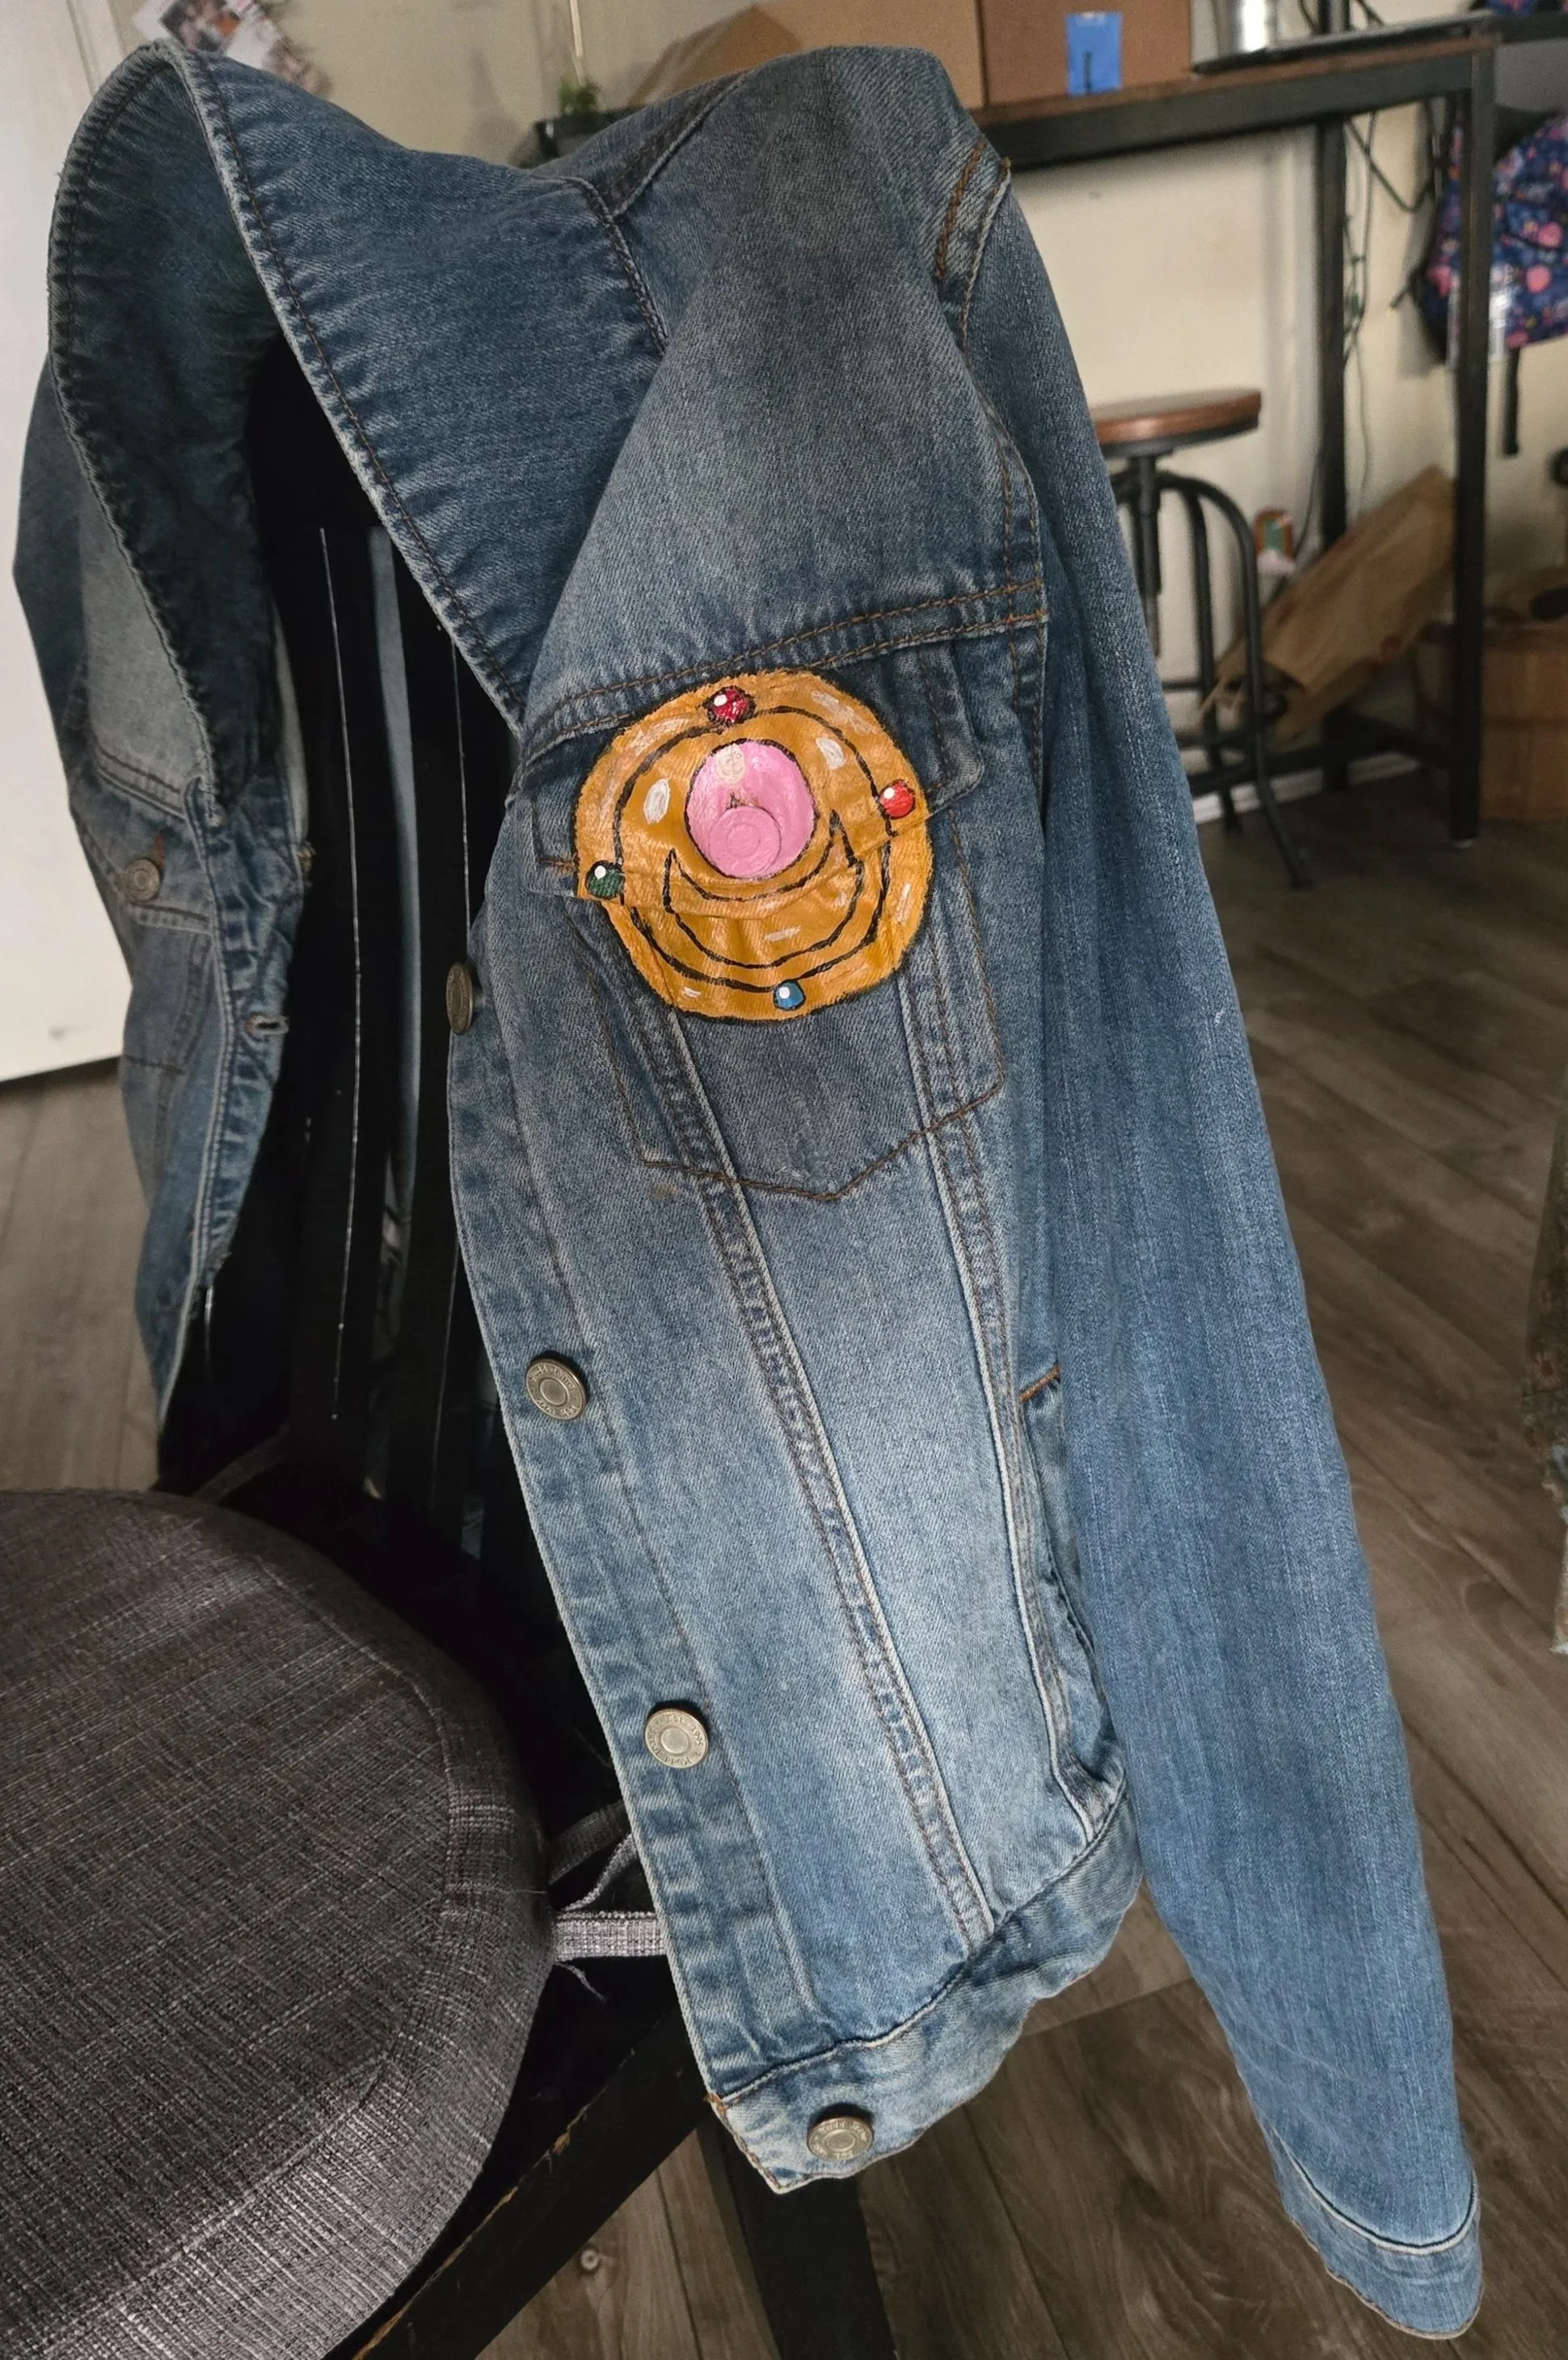
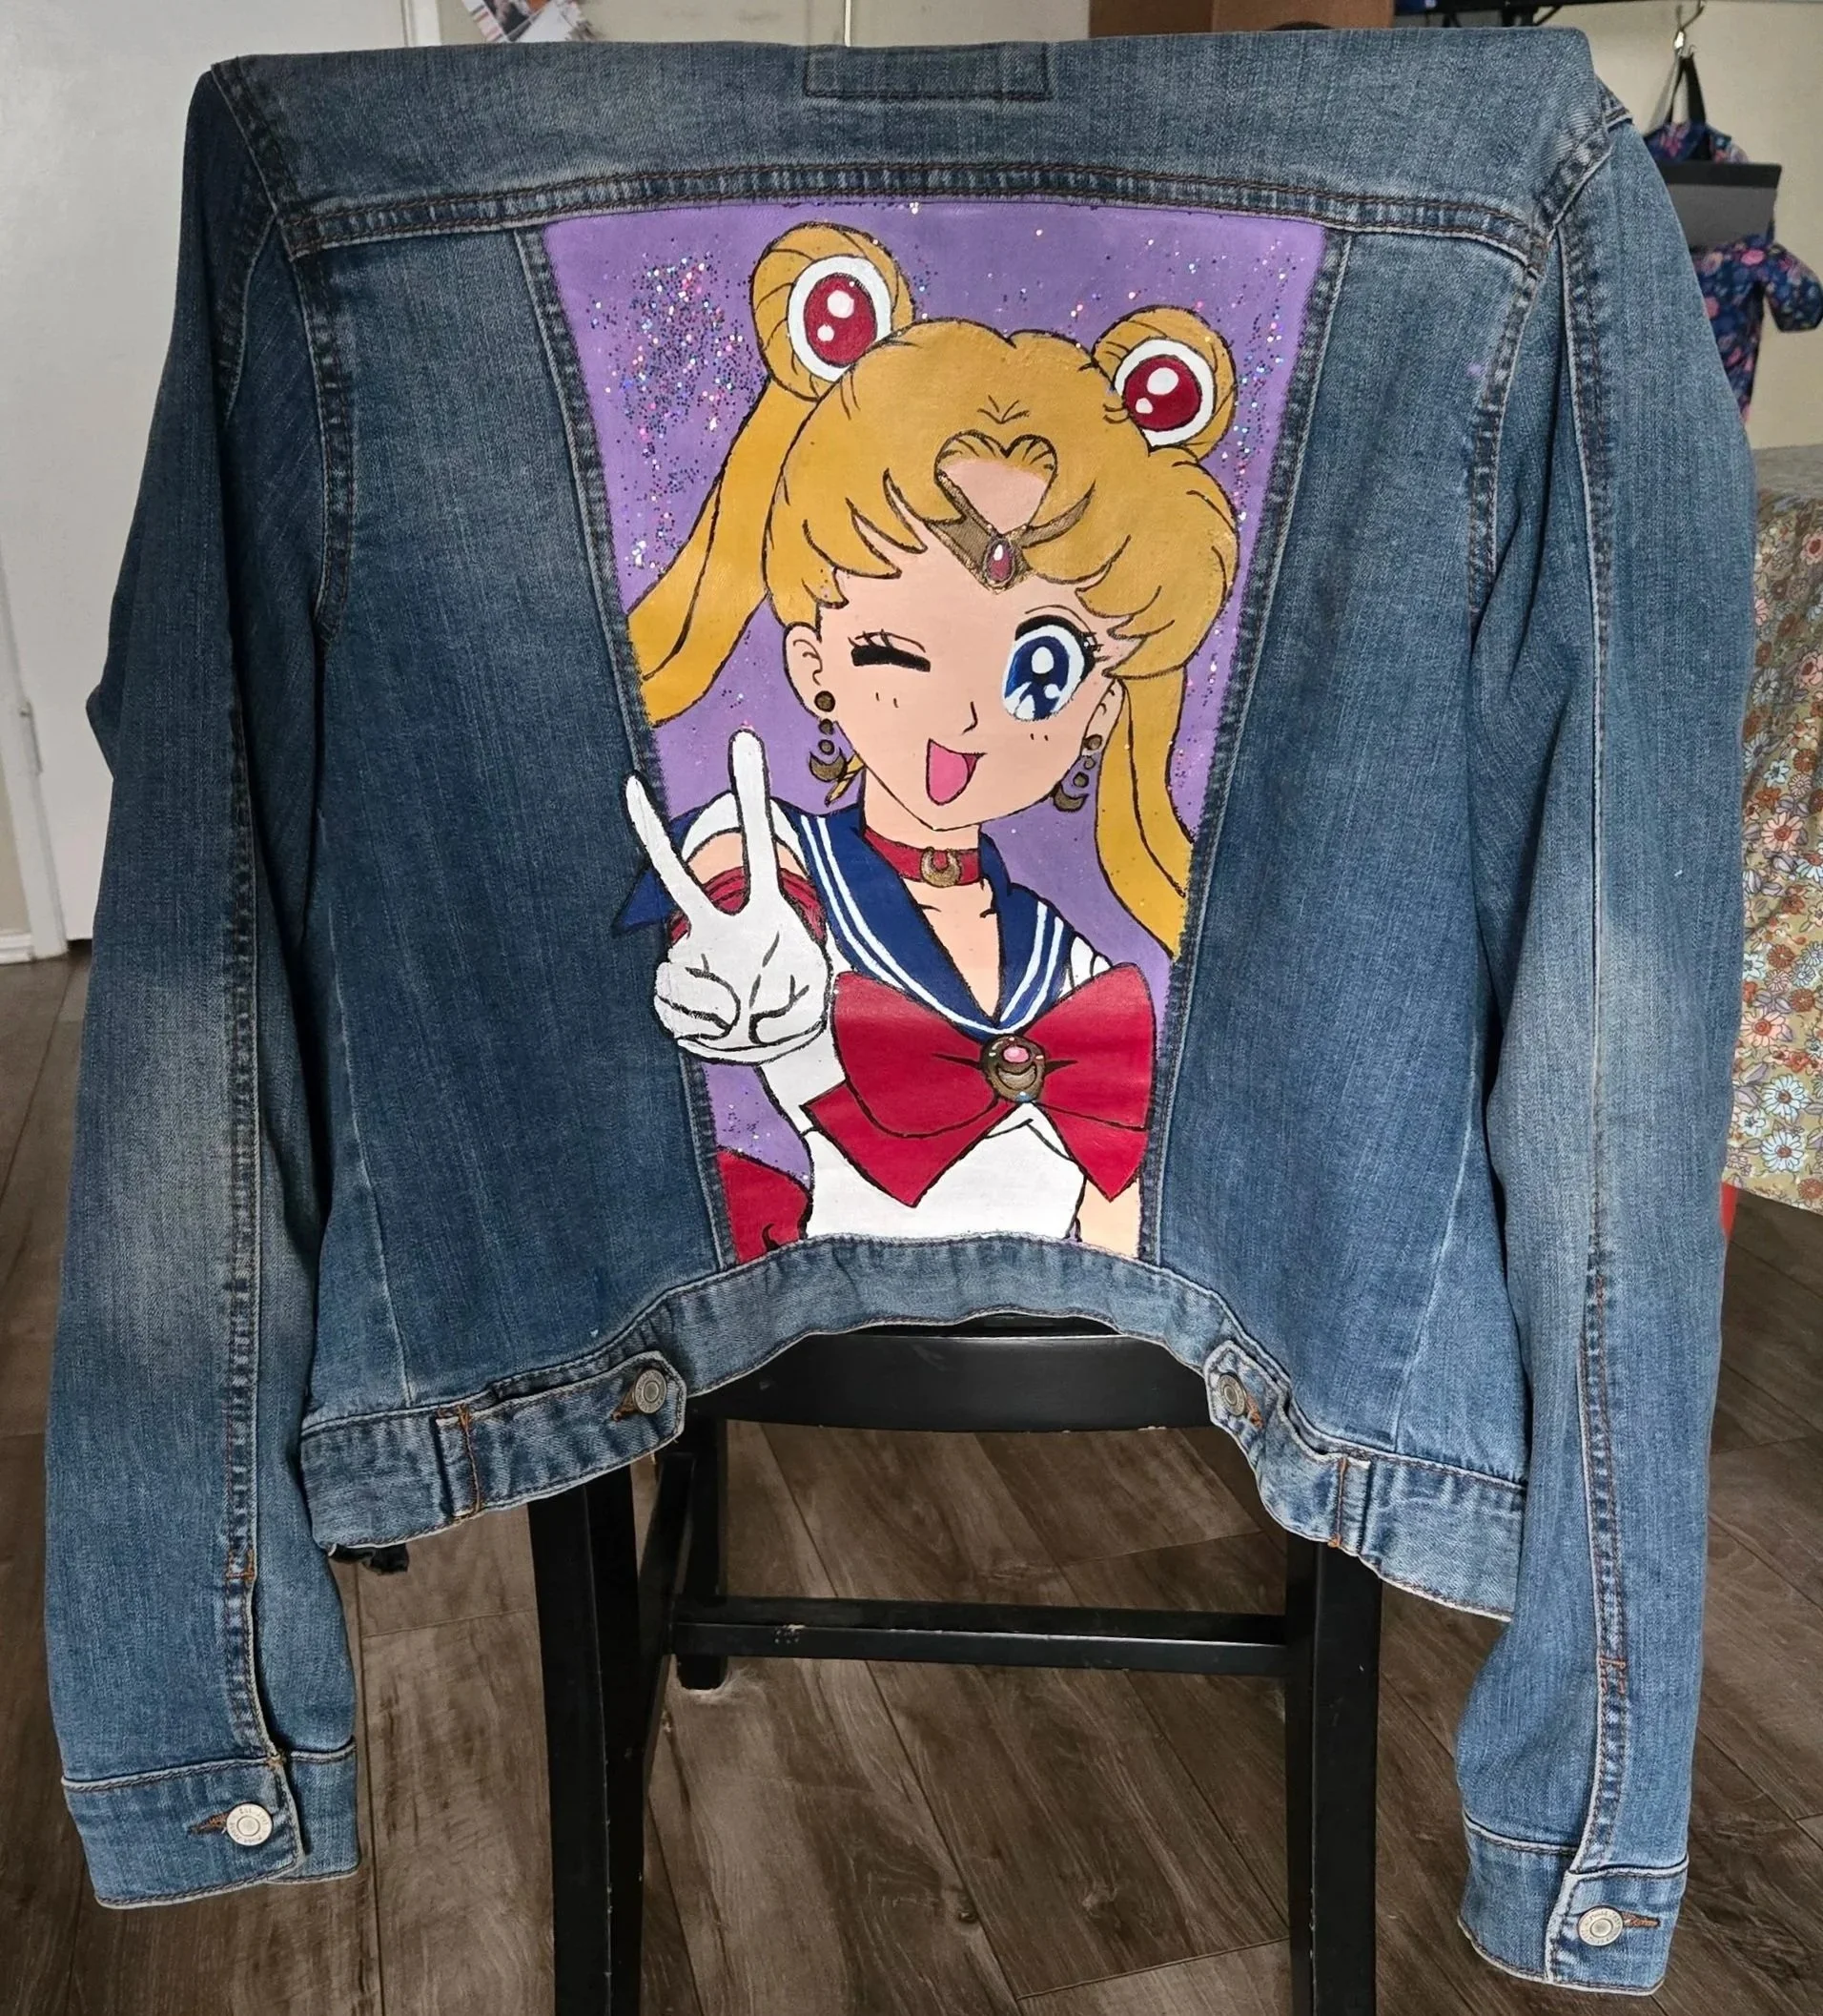
When I was done with the main artwork on the back, I decided to add a broach to the front of the jacket (so people would know I was a weirdo nerd no matter what direction they saw me from).
I foolishly thought it’d be cute to incorporate the pocket button as the crystal in the design & paint over it. It actually worked, but it was touch-and-go there for a while painting over all the wrinkled texture of the pocket and stitching, and I would not recommend the headache.
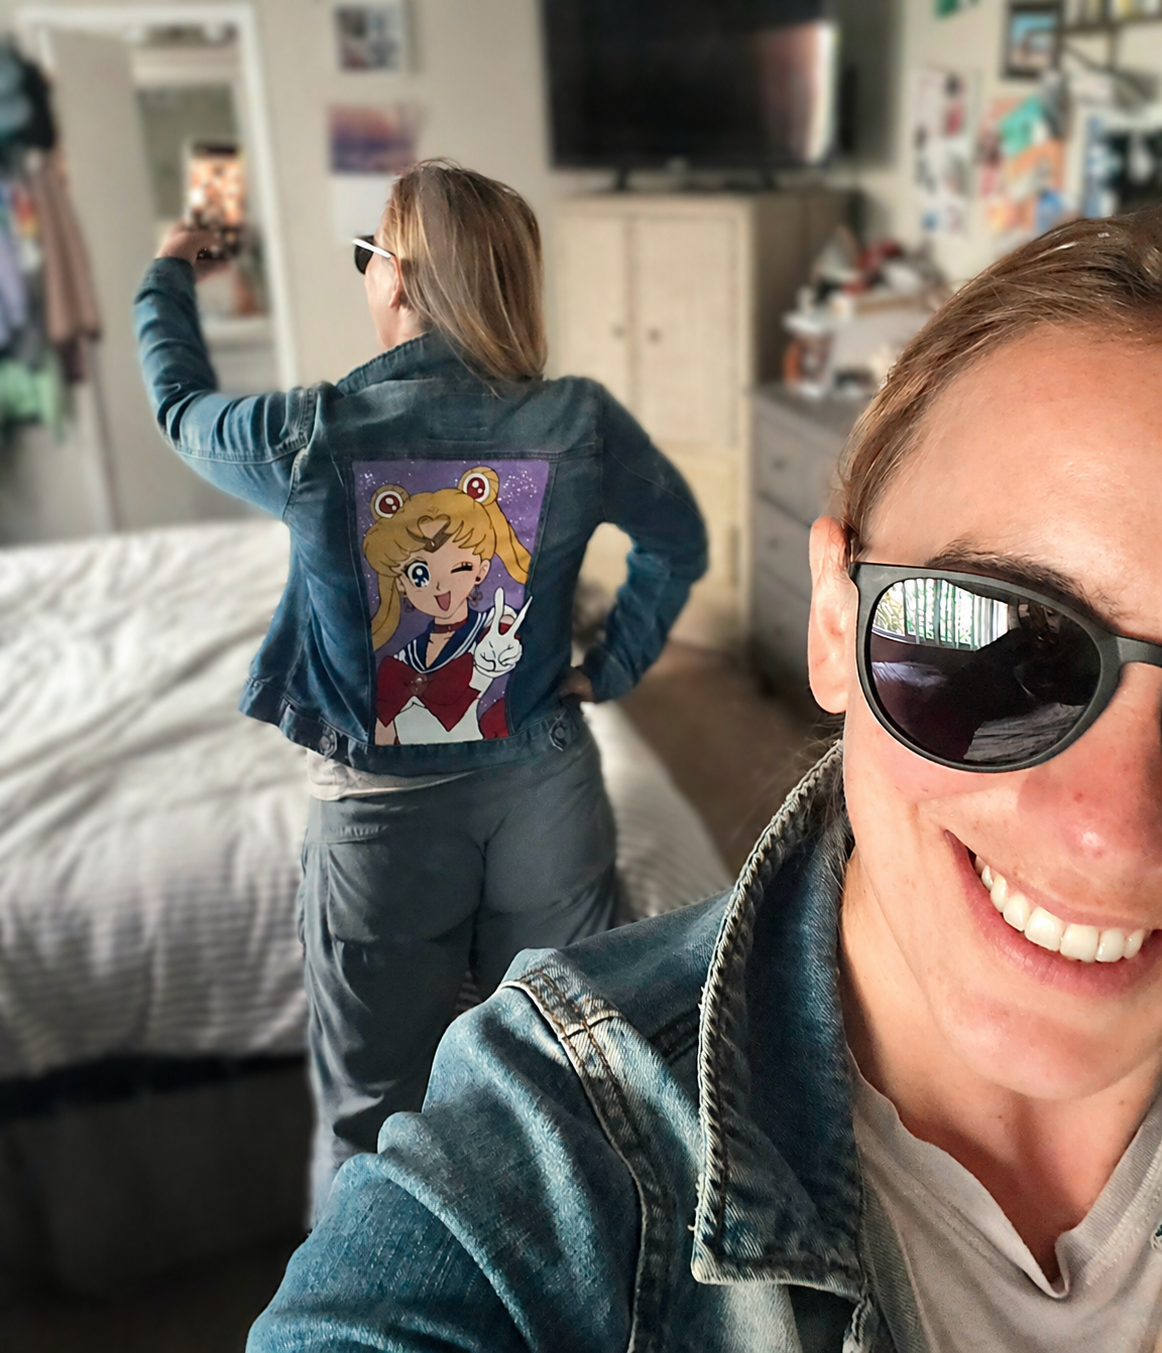
Phase 4: Wear It!
And that’s it! No sealer or anything else required. I don’t trust it in the washer/dryer, so will probably only spot clean it going forward, but this was a fun and relaxing project for a rainy weekend. Now I want to go thrifting and paint all the things! Thinking maybe a Spongebob hat is in my future…🤔
Oh, and remember what I said about my original denim jacket making me look like an art teacher? Well, that’s still the case—probably even moreso now—but this time, we’re doing it the right way. 🎨💃
If ya can’t (or won’t or don’t want to) buy the things you want, make them yourself!